Savor the Morning: Delightful Breakfast and Brunch Creations to Start Your Day on a delightful culinary journey!
Today I’m bringing the magic of leisurely breakfast and brunch ideas offering step-by-step how-to recipes, techniques, and tips, each sure to transform your mornings (or any part of your day).
Whether you’re a fan of the classic comfort of bacon, egg, and cheese biscuits, the refined elegance of prosciutto crudo rolls, a twist on the classic ham, poached egg and cheese bagel, or the vibrant freshness of guacamole toast, I’ve got you covered.
Each recipe is crafted to bring out the best in its ingredients, balancing flavors and textures to create dishes that are both comforting and exciting. So, grab your apron, and let’s get into these four delicious possibilities.

Whether you’re planning a special brunch for family and friends or just looking to elevate your morning meal, these recipes are sure to bring joy and flavor to your table. Let’s make every morning a reason to celebrate with these irresistible breakfast and brunch ideas!
Breakfast and Brunch Ideas – Bacon Egg & Cheese Biscuit
Imagine biting into a warm, buttery biscuit layered with crispy bacon, a perfectly fried egg, with tomato and your favorite greens, plus cheese, of course—a classic combination that never fails to satisfy.
Let’s start with Biscuits
There are many ways to make homemade biscuits, but the basic ingredients are usually flour, baking powder, salt, butter, and milk.
Here are steps to follow:
- In a large bowl, whisk together the flour, baking powder, salt, and sugar if using.
- You can use all-purpose flour or a mix of all-purpose and cake flour for lighter biscuits.
- You can also add some herbs, cheese, or bacon bits for extra flavor.
Cut in the cold butter with a pastry blender, a fork, or your fingers until the mixture resembles coarse crumbs.
You can also use shortening or lard instead of butter, but butter gives more flavor and flakiness. Make sure the butter is very cold and work quickly to avoid melting it.
- Make a well in the center of the flour mixture and pour in the milk.
- You can use regular milk, buttermilk, or even sour cream for more tanginess.
- Stir gently with a wooden spoon or a spatula until a soft dough forms.
- Do not over mix or the biscuits will be tough.
Turn the dough out onto a lightly floured surface and knead it briefly, about 10 times, until smooth.
- Do not overwork the dough or the biscuits will lose their flakiness.
- Pat or roll the dough to about 1/2 inch thickness.
- Cut out the biscuits with a round or square biscuit cutter, a floured glass, or a knife.
- You can re-roll the scraps, but the biscuits may not be as tender.
Place the biscuits on an ungreased or parchment-lined baking sheet, leaving some space between them.
- You can brush the tops with some melted butter, egg wash, or milk for more browning and crispiness.
- Bake in a preheated oven at 450°F for 10 to 15 minutes or until golden and risen.
Note: You can store your biscuits in an airtight container at room temperature for up to two days, or freeze them for up to three months.
Frying the Bacon to Perfection
Frying bacon to achieve a fully cooked but not overly crispy texture is all about managing the heat and cooking time. Here’s a straightforward method to fry bacon to that perfect middle ground:
Instructions
- Start with a Cold Pan: Place the bacon slices in afrying pan or skillet (preferably non-stick or cast iron) before you turn on the heat. This helps render the fat slowly and cook the bacon evenly.
- Heat Slowly: Turn the heat to medium-low. You want to cook the bacon gently so that it cooks through without burning.
- Cook Gradually: Let the bacon cook undisturbed for a few minutes. The fat will start to render, and the edges will begin to brown.
- Flip Regularly: Once the bacon starts to curl and brown at the edges, use tongs or a fork to flip the slices. Continue to cook, flipping the bacon occasionally to ensure even cooking. This flipping is key to cooking the bacon thoroughly without letting it become too crispy.
- Monitor the Texture: Keep an eye on the bacon as it cooks. It should start to become golden brown and slightly crispy at the edges, but still pliable and soft in the middle.
- Drain the Bacon: Once the bacon reaches your desired level of doneness, remove it from the pan and place it on a plate lined with paper towels. The paper towels will absorb excess grease.
- Let it Rest: Allow the bacon to rest for a minute or two on the paper towels. It will continue to cook slightly and firm up a bit more after being removed from the heat.
- Serve: Serve the bacon while it’s still warm and tender.
Tips
- Thickness Matters: Thicker-cut bacon will take longer to cook and can be easier to cook to this level of doneness without becoming too crispy.
- Watch the Heat: If the bacon is cooking too quickly and starting to crisp up, lower the heat.
- Bacon Fat: You can save the rendered bacon fat for cooking other dishes. It adds a rich flavor to foods like eggs, potatoes, or greens.
- Avoid Overcrowding: Cook the bacon in batches if necessary. Overcrowding the pan can lead to uneven cooking.
This method should give you bacon that’s fully cooked, with a nice balance between being tender and lightly crispy. It’s perfect for breakfast dishes, sandwiches, or as a side. Enjoy your perfectly cooked bacon!
Frying a Broken Yolk Egg
Frying an egg with a deliberately broken yolk for a sandwich can be a tasty choice, especially if you prefer the yolk to be more evenly distributed in each bite. Here’s how to do it:
Ingredients
- Eggs (as many as you need for your sandwiches)
- Salt
- Pepper
- Cooking oil or butter
Instructions
- Heat the Pan: Place your non-stick pan on the stove and heat it over medium heat. You want the pan to be hot enough to cook the egg quickly but not so hot that it burns.
- Add Oil or Butter: Add a small amount of cooking oil or a pat of butter to the pan. Allow it to melt and spread it around the base of the pan.
- Crack the Egg: Crack an egg directly into the pan. If you’re not confident about cracking it directly, you can crack it into a small bowl and then gently slide it into the pan.
- Break the Yolk: Once the egg is in the pan, quickly but gently break the yolk with a fork or the tip of a knife. You can either just puncture the yolk or spread it slightly with the fork.
- Season the Egg: Sprinkle a little salt and pepper over the egg.
- Cook to Desired Consistency: Allow the egg to cook until the whites are set and the yolk has reached your preferred level of doneness. This usually takes about 2-4 minutes. If you like the bottom crispy, you can leave it a bit longer.
- Flip the Egg (Optional): If you prefer both sides of your egg to be cooked, gently flip it over with a spatula and cook for an additional minute or so.
- Serve on Your Sandwich: Once cooked to your liking, use the spatula to lift the egg out of the pan and place it onto your sandwich.
Tips
- Control the Heat: Keep an eye on the heat. If the pan gets too hot, the egg will cook too quickly and can become rubbery.
- Non-Stick Pan: Using a non-stick pan can make it easier to handle the egg without it sticking or breaking apart.
Enjoy your sandwich with the perfectly fried, broken-yolk egg! It’s a simple yet delicious way to add protein and flavor to your meal.

Or perhaps you’re in the mood for something with a bit of an upscale café vibe?
Breakfast and Brunch Ideas – Ham Egg & Cheese Bagel
Our ham, poached egg, and cheese on a toasted bagel will transport you to your favorite brunch spot from the comfort of your own home.
How to Cook the Perfect Poached Egg
Cooking the perfect poached egg is a simple process that requires a bit of technique. Here’s a step-by-step guide to help you achieve a beautifully poached egg with a runny yolk and tender whites:
Ingredients
- Fresh eggs (as many as you want to poach)
- Water
- A pinch of salt
- A splash of vinegar (white or cider vinegar works well)
Equipment
- A deep saucepan or a small, deep frying pan
- A slotted spoon
- A small cup or ramekin
Instructions
- Fresh Eggs are Key: Use the freshest eggs you can find. Fresh eggs have firmer whites that hold together better in the water.
- Boil Water: Fill your pan with about 3-4 inches of water and bring it to a boil. Then, reduce the heat to a simmer. You should see small bubbles at the bottom of the pan, but the surface should not be disturbed.
- Add Vinegar and Salt: Add a splash of vinegar and a pinch of salt to the water. The vinegar helps the egg whites coagulate more quickly, which gives you a neater poached egg.
- Crack the Egg: Crack an egg into a small cup or ramekin. This makes it easier to slide the egg gently into the water.
- Create a Whirlpool (Optional): Before adding the egg, use a spoon to create a gentle whirlpool in the water. This technique helps the egg white wrap around the yolk.
- Gently Add the Egg: Hold the cup close to the water’s surface and gently let the egg slide into the center of the whirlpool. Cook for about 3-4 minutes for a soft yolk, or a little longer if you prefer a firmer yolk.
- Remove and Drain: Use a slotted spoon to carefully lift the egg out of the water. Let any excess water drain off.
- Serve Immediately: Poached eggs are best served fresh and warm. You can trim any ragged edges with a knife for a neater appearance if you like.
- Repeat for More Eggs: If you’re poaching more than one egg, keep the water at a gentle simmer and repeat the process.
Tips
- Avoid Crowding: Don’t try to poach too many eggs at once, as this can make it hard to control the cooking and can lead to eggs sticking together.
- Temperature Control: Keep the water at a gentle simmer. Boiling water can break up the egg whites.
- Using Older Eggs: If your eggs aren’t super fresh, you can strain them in a fine mesh sieve to remove the runniest part of the white.
Enjoy your perfectly poached eggs on a toasted bagel, ham, and cheese for a little twist on a classic breakfast!

For those who love a touch of gourmet sophistication, our Prosciutto Crudo Rolls are a symphony of flavors and textures…
Breakfast and Brunch Ideas – Prosciutto Crudo Rolls
Prosciutto crudo, known for its delicate, salty flavor and tender texture, is traditionally served uncooked.. It’s a type of dry-cured ham from Italy that is typically sliced very thin and enjoyed as is. However, if you’d like to add a twist and gently warm it for use on an open-faced buttered dinner roll, here’s a simple and respectful way to do it:
Ingredients
- Prosciutto crudo slices (as many as needed for your rolls)
- Dinner rolls
- Butter (for the rolls)
Instructions
- Prepare the Rolls: Begin by lightly toasting your dinner rolls, if desired. Then, spread a thin layer of butter on the cut side of each roll. The warmth of the toasted roll will melt the butter slightly.
- Heat the Pan: Place a non-stick frying pan on the stove over low to medium-low heat. You want to gently warm the prosciutto without cooking it too much, as it can become tough and overly salty.
- Warm the Prosciutto: (Optional) Lay the prosciutto slices in the pan in a single layer. Heat them for just a few seconds on each side. The goal is not to cook the prosciutto but to slightly warm it and perhaps render a bit of the fat, enhancing its flavor and making it more pliable.
- Serve Immediately: As soon as the prosciutto is slightly warmed, use tongs or a spatula to transfer it onto the buttered dinner rolls. Be gentle to maintain the integrity of the slices.tto flat or give it a little twist or fold for a more elegant presentation atop the rolls.
- Optional Additions: If you like, you can add a slice of cheese, a sprinkle of herbs, or a drizzle of olive oil or balsamic glaze for extra flavor.
Tips
- Watch the Heat: Keep the heat low to avoid crisping or overcooking the prosciutto.
- Quick Process: The warming process should be very quick, just enough to release the flavors without altering the texture significantly.
- Quality Matters: Good quality prosciutto crudo is key for the best flavor and texture.
This simple preparation preserves the delicate taste and texture of prosciutto crudo while adding a slight warmth that can complement a buttered roll beautifully. It also makes for an elegant and delicious nibble or side!
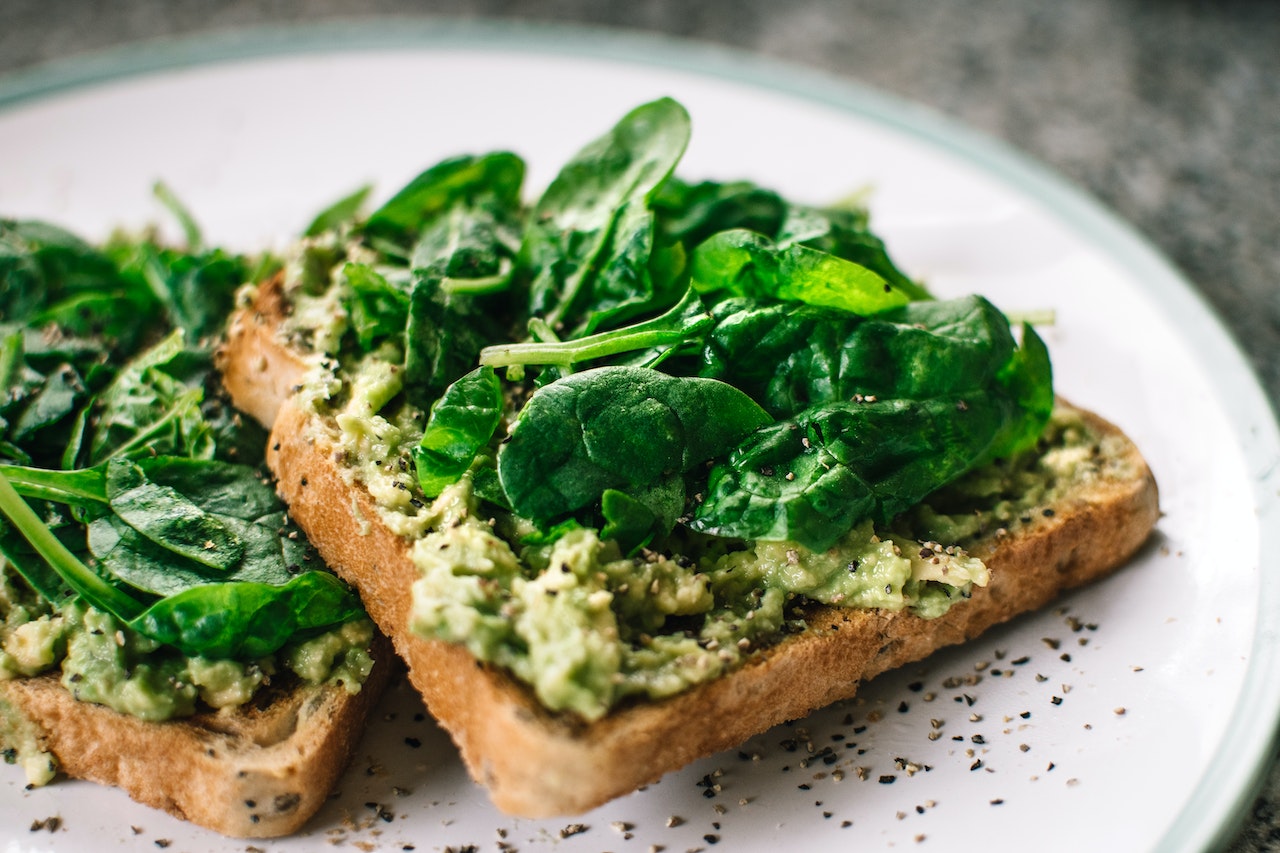
Let’s not forget the ever-popular, health-friendly guacamole toast, a dish that’s as much a feast for the eyes as it is for the palate
Breakfast and Brunch Ideas – Guacamole and Spinach Toast
Making a delicious guacamole to spread on toast is quite simple and can be a delightful treat. Here’s a basic recipe that you can follow:
Ingredients:
- Ripe avocados (2-3, depending on size)
- Fresh lime juice (from 1 lime)
- Salt (to taste)
- Freshly ground black pepper (to taste)
- Finely chopped red onion (about 1/4 cup)
- Diced tomatoes (1 medium, optional)
- Minced garlic (1-2 cloves, optional)
- Chopped cilantro (a handful, optional)
- Chili flakes or a diced jalapeño (for a spicy kick, optional)
Instructions:
- Prepare the Avocados: Cut the avocados in half, remove the pits, and scoop the flesh into a bowl.
- Mash the Avocados: Use a fork to mash the avocados to your desired consistency. Some people prefer it chunky, while others like it smoother.
- Add Lime Juice and Seasonings: Squeeze the lime juice over the mashed avocado. Add salt and black pepper to taste. The lime juice not only adds flavor but also helps prevent the avocado from browning.
- Mix in Additional Ingredients: Stir in the chopped onion, diced tomatoes, minced garlic, cilantro, and chili flakes or jalapeño if using. These ingredients are optional but add a great depth of flavor.
- Adjust and Serve: Taste the guacamole and adjust the seasoning if necessary. It should be a balance of creamy avocado, acidity from the lime, and the savory elements from the added ingredients.
- Spread on Toast: Spread a generous amount of guacamole on your toast. You can use any type of bread, but a crusty, whole-grain variety often complements the creamy texture of the guacamole well.
- Optional Toppings: For an extra touch, you can top your guacamole toast with a sprinkle of feta cheese, sliced radishes, or extra chili flakes.
Enjoy your guacamole spread on toast as a delicious snack, breakfast, or light meal! Remember, the best guacamole is made with ripe, creamy avocados and fresh ingredients. Feel free to adjust the recipe to suit your taste preferences.
I truly hope you enjoy these four Breakfast and Brunch Ideas!
You may be interested in more breakfast ideas here…
[amazon bestseller=”bakeware” items=”2″][amazon bestseller=”egg poacher” items=”1″]